
Good Morning and Happy Monday!! Today I am sharing another autumn card that I made over the weekend showcasing the lovely WPlus9 Autumn Blessings stamp and die. But this has such a sweet surprise…
Since fall is my favorite season, I knew I had to have this stamp set. I wanted to try something a little different, so I decided to go ahead and give it a go. I made this card with a removable stamp as a magnet. It was such a lovely design that I wanted to be able to showcase it in other ways.


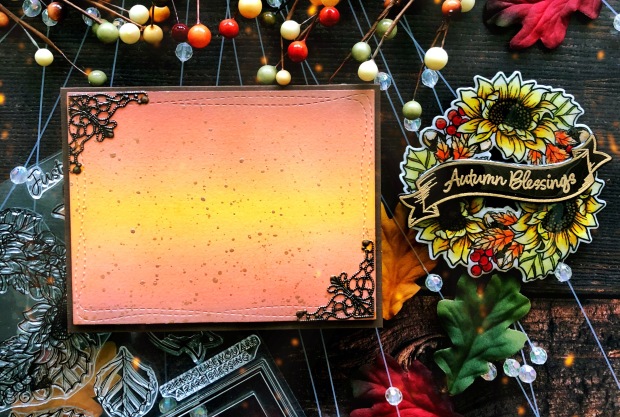
To start, I ink blended my background panel with Distress Ink Oxides in Mustard Seed, Ripe Persimmon, and Spice Marmalade on smooth Bristol paper. I added some metallic gold splatters for added detail and then set that aside. I stamped my image of the bouquet on watercolor paper which I colored with my Zig Watercolor Brush Markers. The sentiment I stamped in Versa Mark Embossing ink and then heat embossed using Gina K. Rose Gold embossing powder. Once I had my images embossed, stamped and colored, I planned on using my novo gloss glaze however my 4-year old son decided to squeeze out my entire bottle while I wasn’t looking, so I had to come up with another plan. I am almost happy he did that because it made me think out of my comfort zone and venture into resin that I have only used a couple of times before.
I did use a scrap piece to test it out and I am glad I did. The watercolor paper soaked up the resin and made it “dark” looking, almost like a water stain. So after some research of how to apply resin to paper, one suggested to “seal” your work BEFORE you pour the resin on top of you piece. I used ModPodge spray as a sealant and it worked perfectly. After allowing the sealant to dry (about 30 min) I was ready to pour my resin. Since resin is self-leveling, all you have to do is make sure that your art work is on a level surface, propped up as you don’t want your piece to stick to any surface as the resin dries. After you pour the resin, you may notice tiny air bubbles that rise to the surface. To get rid of these air bubbles, you can use a simple low flame torch (some resin sellers actually sell a torch with a kit) just to braze the top and they pop almost instantly. You want to do this while the resin is still wet. You can also you a pin to pop or a lighter works as well. When you do this you will be able to see how “clear” the image is under the resin. Now resin does take 24-48 to fully dry and become acrylic. You may want to cover your piece so dust or any other particle doesn’t settle on top, I covered my piece with a box. After 24 hours it was still tacky, so I waited another day and it was perfect. Hard and ultra glossy.

Once everything was dry, I attached the sentiment with foam adhesive. I then glued on with ultra glue 3 super strong magnets on the back of the bouquet (because of the panel that is sandwiched between the magnets, you want to make sure that you are using very strong magnets). I added foam tape around the edge of my inked panel on the back leaving an open square in the middle. I then cut a 4×6 magnet sheet that I use for storage for my dies, and glued that in empty square on the back of the panel. Now I knew I wanted my bouquet centered on my card so this gave me plenty of space of magnetism to work with. I then adhered my inked panel onto my card base. I adorned 2 of the corners with thin metal corner frames for an added touch.


Now the real test was to see if it would actually hold when the card was displayed and I am happy to say it did! Yay… Success! It is easy removable leaving the card panel undamaged, and you can display on any magnetic surface. I displayed mine to show you on my pink toolbox that I have in my craft room.

I am thrilled with the results, and hope it inspires you to go ahead and give it a try! Thanks for stopping by and have a great day!
♥♥♥♥♥

WOW, you are so amazingly creative!!! I’m not a fan of autumn or fall colors but I love this! So proud of you, Danielle. 🙂
LikeLiked by 1 person
Absolutely beautiful!!!! Love the design and everything about it 😍😍😍
LikeLiked by 1 person
My love! This is such a great idea! A classic fall color card with a resin made Autumn magnet ready to use. Very clean and simple design, it looks great!!
LikeLiked by 1 person
I like how you colored the florals, just beautiful! The background looks awesome and the metal corner pieces finish it off beautifully. Now the magnet is genius, I love it! Thanks for sharing and the inspiration.
LikeLiked by 1 person
Yay!! This is Absolutely Beautiful! Your design and color combination are just Perfect! 😍🧡🧡🧡🧡🧡
LikeLiked by 1 person
Absolutely amazing!!!
LikeLiked by 1 person
This is beyond the beyond!! Totally over the top cute project and execution. Gotta say, your photography and styling are almost as great as the magnet! hehe! Love the look of that resin. Wow, I want to make a magnet!
LikeLiked by 1 person
Very nice blog you haave here
LikeLike